Showing posts with label tech tips. Show all posts
Have you ever wanted to send confidential information within your work environment, to family or friends, but were afraid to do so over the internet, because some malicious hacker could be spying on you?
Privnote is a free web based service that allows you to send top secret notes/messages over the internet as unique one-time-use HTTPS URLs  that expire after its first access via any web browser.

It's fast, easy, and requires no password or user registration at all. Just write your note, and you'll get a link. The link generated for the note starts with HTTPS ie. it is encrypted with 128-bit encryption so there is no worry about you note's security. Then you copy and paste that link into an email (or instant message or Facebook message) that you send to the person who you want to read the note. When that person clicks the link for the first time, they will see the note in their browser and the note will automatically self-destruct; which means no one (even that very same person) can read the note again. The link won't work anymore [Link won't even work in History of the browser] but recipient can copy the note or can take screenshot. 

[Note: Don't open the link to check it , it will self destruct the same moment and will not work afterwords]
The note will self-destruct after being read

You can also choose to be notified when your note is read by submitting your email and a reference for the note. When a note is retrieved, you will be notified and its data is completely removed from Privnote, which implies there is absolutely no way to recover it again.

"Since only the link binds the decryption key to the note's content and since Privnote does not have the link, at no time is any note held in any readable format state at Privnote. This assures that nobody (including Privnote's administrators) can read a note."

Even if you lost the link there is no worry as when a note is not retrieved after 30 days, Privnote removes it permanently, just as if it were read.

Note: Depending on the communication channel of your choice (e.g., email, fax, SMS, phone, instant messaging), there may be a certain risk that third parties intercept your communication, get knowledge of the communicated URL and thus may be able to read your message.

Tip: If you regret sending the note or if I mistakenly send it to someone you do not want to read it? Simply open it at your browser it will be destructed.
I hope the next you need to send a confidential information you must remember this service to use. 
Sometimes we want to send large file over the internet which most of the email services don't allow us to  do so. The max file size of attachment  is 25 MB for a single email and to send a large file we may need to split the file. You may also send it by uploading at file sharing sites but that is not affordable sometimes and it may risk your privacy. But what we are here going to do is to transfer the files directly to the peer without being stored anywhere. Pipebytes allows to send music, movies, presentation or any kind of files via browser at free of cost, you don't need to install any kind of software or plugin/extension etc. and you don't even need to register on the site and no hassle to fill email address, all you need is a browser and your file. It supports all major browsers on all popular operating systems. The peer can download the file as soon as it uploads from your side. It offers a speed of 5 Mbps and speed up to 30 Mbps per transfer with Speed pass[24-hour Speed Pass for $0.99] which is very cheap.

Lets see how it works:
Open pipebytes.com in your browser.
Choose the file that you want to send and click transfer file, you will be then  prompted with a pick up code.


Forward the pick up code to file recipient. Once recipient enters the code he/she will be able see the details about the file that is going to be received and click on start transfer to start the file transfer.

Once the file transfer had started, the sender will also be able to see the progress of file transfer [ Note: You should not close the browser tab/window till the whole transfer is done ]
.
Its very simple and all just happens within the browser. You can send file of any size anywhere you want to send.

Its very easy way to send large files to anyone. Hope you find this useful.
You can delete a file either by pressing DELETE button and then empty the recycle bin some other day or you may do SHIFT+DELETE to delete it permanently but to your surprise its not permanently deleted .Here is why


"When you delete files or folders, the data is not initially removed from the hard disk. Instead, the space on the disk that was occupied by the deleted data is "deallocated." After it is deallocated, the space is available for use when new data is written to the disk. Until the space is overwritten, it is possible to recover the deleted data by using a low-level disk editor or data-recovery software."

Before the file is overwritten, anyone can easily retrieve it with a disk maintenance or an undelete utility.

  Read more:   How to undelete and recover your deleted files

To permanently erase files and prevent your confidential files from getting into wrong hands, Microsoft offers a free command line utility – SDelete (Secure Delete) – that overwrites all the free space to prevent data recovery. But if you are not comfortable with command line utility, there is an other very easy and free program called eraser. It completely removes sensitive data from your hard drive by overwriting it several times with carefully selected patterns.

Some of the features of Eraser are:
  1. It works with Windows XP (with Service Pack 3), Windows Server 2003 (with Service Pack 2), Windows Vista, Windows Server 2008, Windows 7 and Windows Server 2008 R2 
  2. It works with any drive that works with Windows
  3. Secure drive erasure methods are supported out of the box
  4. Erases files, folders and their previously deleted counterparts
  5. Works with an extremely customisable Scheduler

Did you find this post useful. Do comment below.
Ever had such an annoying message given by Windows?

Cannot delete file: Access is denied
There has been a sharing violation.
The source or destination file may be in use.
The file is in use by another program or user.
Make sure the disk is not full or write-protected and that the file is not currently in use.
Want to Delete a file (or folder) but unable to do so because the “file is in use”. The solution is very simple, just use Unlocker to end all the locking processes. There are many similar utilities also but unlocker is much powerful than others because it can Close/Kill process, Unload DLL, Delete index.dat, Delete Rename/Move, supports both Command Line / GUI and is Free.

Click here to Download this simple utility.
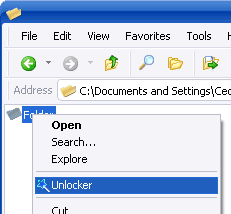
After installing, Simply right click the folder or file that you are trying to delete and then select Unlocker


 If the folder or file is locked, a window listing of lockers will appear


Simply click Unlock All and you are done!


Hope you liked this little tweak. Do post your queries in the comment box below.
QR code for Facebook fan page of this blog
QR Code (Quick Response Code) is a two dimensional code consists of black modules (square dots) arranged in a square pattern on a white background. The information encoded can be made up of four standardized kinds ("modes") of data (numeric, alphanumeric, byte/binary, Kanji), or through supported extensions, virtually any kind of data.[Wikipedia]
You can easily create QR Codes for your self via scan.me , with it you can make:

Business Scan Page
A mobile friendly menu which enables your customers to easily interact with and share your business.

Personal Scan Page
A beautiful mobile version of your contact information and web profiles. Perfect for your business card and more.

Social Media Actions
Create social experiences through QR codes: Scan to Like on Facebook, Scan to Follow on Twitter, Scan to Check In on FourSquare, and more.

Website
Take your users to any URL. It is best practice to make sure the page is optimized for mobile devices.

Simple Text
Display a note or message.

Wi-Fi
Scan a QR code to instantly connect to a Wi-Fi network, even one that is password protected.


To create QR codes you will need to signup first. The site offers analytics services with every QR code generated by you in your account , it helps to track performance of your QR code.

Quick Tip: TO create QR code for URL's Only , like you want to people visit your website, facebook page you can use this quick tool which does not require any sign up.

Have you ever done any campaign, promotion using QR codes . Do share your experience in comments below.


YouTube Frames is a new way of viewing the storyboard of the YouTube videos that give users a much a better idea of what’s inside any YouTube video . For instance, here’s the YouTube generated storyboard for  iPhone5- Rumours video.

Demo: iPhone5- next iPhone rumour update video
With the help of YouTube frames you can quickly review what's inside the video to decide whether to watch it or to skip it and save time by gathering the information from the frames. Internally, YouTube splits the video into multiple segments and each of these segments is represented with a single image frame. All these frames are then stitched together to form one big image that can help you visualize the entire video at a glance. When you watch a video on YouTube, your browser downloads the corresponding storyboard images in the background and is stored in browser cache and difficult to retrieve but this bookmarklet will easily solve you purpose.

Just add [Drag it to you bookmark tool-bar] the following YouTube Frames bookmarklet to your browser.

Open any video on the YouTube, then click the bookmarklet and it would display all the still image frames of that video on one page.
Note: it won’t work for embedded videos
-->
This bookmarklet is Created by Amit Aggrawal Of Digital inspiration
Is your mouse broken, or did you just forget it? Or maybe you are having USB driver problems, and your mouse isn't working in addition to that you have an urgent works to do!! BAD LUCK . But now its no more, just think about a virtual mouse, yes its possible to use your keyboard to control the mouse pointer virtually with Mouse Emulator- it emulates mouse movements as well as clicks via the keyboard. Mouse Emulator[Download here ], is a free Windows utility (~10kb only) that lets you control the mouse pointer using the keyboard. Just run the program, and it will show you which keys you have to press to move the mouse cursor. This program is also very useful for laptop owners with low quality mouses. Just hold down the Fn key, and you can use the numeric keypad in the center of your keyboard to move the mouse! Mouse Emulator can also toggle mouse buttons with a simple key press. This is very useful for RSI users that have problems with drag operations with the mouse.

It maps the following keys to mouse movements: (NumLock must be ON!)
  • Keypad 1 - Left mouse button
  • Keypad 2 - Right mouse button
  • Keypad 3 - Middle mouse button
  • Keypad 4, 5, 6, 8 - Moves the mouse left, down, right and/or up respectively.
  • Keypad 7 - Mousewheel up (Scroll)
  • Keypad 9 - Mousewheel down (Scroll)
  • Keypad / - Toggle Left mouse button (Useful for RSI users)
  • Keypad * - Toggle Right mouse button (Useful for RSI users)
  • Keypad - - Toggle Middle mouse button (Useful for RSI users)
You can exit Mouse Emulator by right clicking on the mouse icon in the taskbar.

Its very simple and quick solution to a no mouse problem.Download here (10 kB)
Hope you  find this little tweak useful. Do comment below.
Is your email account filled up with lot of newsletters, daily deals, special offers, useless subscriptions, bulk mails, junk messages etc.??  And you are tired of deleting them manually daily. Lazy to unsubscribe them or perhaps you don’t know to which unnecessary things you have been subscribed which you loved some day but now you don’t feel any interest in them and have stopped using them. This happens to most of us but manually finding , unsubscribing and creating email filters for them is tiresome job.
Easily unsubscribe From Junk and Bulk Mails

Here is a quick solution to this very big problem. It has been possible by online service called Swizzle Inbox Manager ( previously  Unsubscribr ), which will help to save your inbox from email overlaod by giving you an option to check the active subscriptions on your email and then let you unsubscribe and delete those junk/bulk email messages. Once you enter your email and with verifivcation you will be able to see the list of subscribed services with two options in front of them, one is just to unsubscribe form the service and the other option actually deletes all previous emails from your account too to get rid of those useless emails. In Gmail you might have used the ‘Search’ options and created filters to manage your email but this online tool seems like a more easier and simpler options which does not take a lot of time.

It works on special process called OAuth to sign in to your email account which look for special parts of email messages to determine whether the message is bulk mail or not. Software just examines them for the telltale signs of bulk. A very similar manner to what you do to sort your regular snail mail. It pick out a random subject line and unsubscribe information from mail that has been identified as bulk so you can use it during the unsubscribe process.

Do you liked this online tool to manage your email account ? Do share your views in comments below.
PDF[Portable Document file] the most commonly used document format , while surfing net there might have been a situation when You have found an awesome article on internet but you want to read it later offline or You have made an on-line transaction and want to print its slip but not having printer or you want to convert a Html file to PDF but the thing you might knew earlier was that you need a PDF writer software
Read : How to convert any file to PDF
which can  do these tasks but now it has gone far simpler with Google Chrome and that too without any Software/extension , Just press CTRL+P and your job is done. See the screen shot if it seemed tough.  Just try to test on this webpage!

CTRL+P will let you reach here
As you can see in the above screen shot that I have been using various PDF writing tools like Foxit PDF Printer, PrimoPDF , doPDF [ my personal favourite PDF writer] all these are capable of creating PDF from any printable document file like  .DOC, .PPT, .HTML etc. But if you want only to print a webpage or HTML file then you don't need any of these or any extension in Google chrome as it now supports to print any webpage to PDF as its InoBuilt feature.
So You Just have to Press CTRL + P and you will reach there. Boom! its done!

Bonus Tips: 

  • You can not only create PDF using print command in the Google Chrome but  you can also read your created PDF in Google chrome hassle free. Adobe reader is no more needed when you have Google Chrome.
  • If you want to create a PDF file having only selected pages from the PDF stored in your PC , Just open it using Google Chrome and then use CTRL+ P [Print command] and fill the page number, in the print dialog box, that you want to get converted in to new PDF file.


Hope you liked this idea!. Do comment if you liked this new In-Built feature of Google Chrome.
Android being one of best mobile device platform and having millions of applications that you can download for free from your android phone. But sometimes we want to download the android market application on our pc[apk files] due poor/no internet connectivity on our mobile device but there is no official method to download APK files. Apk files may also be required as backup of our apps on our pc though we can also backup our app using very popular apps like "Astro file manager". The solution to this problem is a google chrome extension called as  "APK downloader". APK Downloader is a Google Chrome extension that allows you to download Android APK files from Android Market to your PC.

Click HERE
 to install APK Downloader extension to your Google Chrome.
In three simple steps you can easily download the APK files on pc and thn transfer it to your sd card to enjoy apps on your android device

1. Disable SSL error warnings
  • Right click on Chrome shortcut, select “Properties
  •  Switch to “Shortcut” tab. In “Target” field, insert [space]--ignore-certificate-errors at the end. Once you have that finished, click “OK” .
  • It will look something like this:
    C:\…\chrome.exe --ignore-certificate-errors
  • Close Chrome and open it again with that shortcut
  • Go to Tools > Extensions and Open APK Downloader Options page. If your screen looks like the right picture ( the warning box is gone ), then you disabled SSL error warnings successfully


NOTE: If you don’t do this step, the extension WILL NEVER WORK. 

2. Enter email and device ID on Options page

  • Open dial pad, call *#*#8255#*#* ( 8255 = TALK ). It will open “GTalk Service Monitor”, find lines that begin with JID and Device ID. Your email is JID, and your device id is a string that after android- prefix
  • For example: It shows android-1234567890abcdef , then your device ID is 1234567890abcdef
  • Enter your email’s password, then press Login.
  • Then choose your country and SIM operator and same settings. You are done with setup, now start using.

    Tip: 
  •  Do not type in random email or device ID, it won’t work 
  • To know your device id and email you can also install an app called DeviceID[click to install]
3. Start using
After finished two steps above, you can start using APK Downloader. Open Android Market/Google play , view any FREE apps , then press the APK Downloader icon on address bar ( see screenshot )


I hope you liked the the post and enjoyed Downloading your favourite android applications to PC. For any any queries drop a comment below.


We wonder how to speed up our Pc but when we search about it we return with result having lots of methods to speed up your pc but as newbie we often find those geeky methods difficult to apply.How would it be if we we can automate the way we configure the pc settings using a software/tool and that too free of cost. Yes its possible . Below are two Free software which can help you to tweak your pc and boost up your pc using the PC speed up configurations that automatically does everything with simple click of a button.

ADVANCED System care Free

Description From The Developers: Free registry repair and cleaner - Advanced SystemCare Free. What does it help? Slow down, freeze, crash and security threats are over. Advanced System Care Free is a comprehensive PC care utility that takes an one-click approach to help protect, repair and optimize your computer. Scanning and finding what other utilities miss, it can keep your PC error-free and smooth than ever. Why Advanced SystemCare Free? New PC Performance - Do you remember the feeling of a brand new PC when you first bought it? Why not try Advanced SystemCare Free, a free PC tune-up utility that focuses on the performance of your PC.

Computer Crashes without Reason - Have you ever encountered your PC crashes and you even did not know why. After months or years of using your PC, there might be plenty of changes, which added burdens to your PC but never get cleaned. What Advanced SystemCare Free does is to clean the stuffs that are left over and clean craps to make your PC neat and clean. Registry Repairing and Cleaning - As an elementary part to a PC, if it does not working well, then your computer will be in big trouble. What does Advanced SystemCare Free do? It cleans the records which is unnecessary to your PC but makes the PC running slow and produces troubles. It also repair parts that are missing and make the PC complete.
Download

Glary Utilities

Description From The Developers:One Click A Day For PC Maintenance, Keeps Any PC Problems Away. With millions of worldwide users, the first-rank & free Glary Utilities is an indispensable friend for your PC, with its 100% safe, thorough & quick cleaning and worry-free restoration. Glary Utilities is a freeware with registry and disk cleaning, privacy protection, performance accelerator and amazing

multifunctional tools. It can fix dogged registry errors, wipe off clutters, optimize internet speed, safeguard confidential files and maintain maximum performance. It is designed for both novice and professionals. User-friendly interface shows clear & detailed directions.
Download

Hope you liked the post.You must share your experience about using these tool in the comments section and why not share this post with your friends.


Game Booster 3 is capable of delivering the best gaming experience to you even if you have an old PC. One-click to boost PC performance is not enough, Game Booster 3 also allows you to tweak your system for top PC performance. By temporarily shutting background processes and unnecessary Windows services, cleaning RAM, and intensifying processor performance, Game Booster 3 concentrates every little system resource for gaming only.This will shut up you tension of tweaking your PC manually for better gaming experience Because it does it all by itself. With simple adjustment options provided in it, you can easily speed up your pc to play your favourite games running perfectly even on an old Computer system.

Game Booster 3

Download:
Direct link: Click here
Alternative Link:Click here

Hope you liked the post .

Did you gaming experience goes better after using this tool? Do share your opinion in the comment section.
A virtual private network (VPN) is a secure way of connecting to a private Local Area Network at a remote location, using the Internet or any unsecure public network to transport the network data packets privately, using encryption. The VPN uses authentication to deny access to unauthorized users, and encryption to prevent unauthorized users from reading the private network packets. The VPN can be used to send any kind of network traffic securely, including voice, video or data.


Instructions to set up VPN connections in Windows 7


  1. Click Start button ->Control Panel to open the control panel window.
  2. Click on Internet options to open the Internet Options dialog box.
  3. Go to the Connections tab , then click on Add VPN.


  4. Now fill Internet address as "freefreevpn.com" "bfvpn.com" "Superfreevpn.com and give destination name of your own choice and then click Next.
  5. Now in username field fill "free" as the username and the password as given on the FreeFreeVpn.com bfvpn.com. superfreevpn.com


  6. Cick "Connect" button to start free VPN connection.
To configure VPN Connections in other devices like WindowsXP , MAC OSX Leopard, iPhone/iPad/iPod Touch, Android Phone and Tablet etc. Click Here

Note:VPN connection requires an active Internet connection on your system.

Hope you liked the post , If having any problem in setting up a VPN connection, ask us queries by commenting below.
Virtual Router is a free, open source software based router for PCs running Windows 7. Using Virtual Router, you can wirelessly share any internet connection (Wifi, LAN, Cable Modem, Dial-up, Cellular, etc.) with any Wifi device (Laptop, Smart Phone, iPod Touch, iPhone, Android Phone, Zune, Netbook, wireless printer, etc.) These devices connect to Virtual Router just like any other access point, and the connection is completely secured using WPA2 (the most secure wireless encryption.)

Download


Virtual Router Manager


Unlike similar applications, Virtual Router is not only completely Free, but will not annoy you with any advertisements. The Wireless Network created with Virtual Router uses WPA2 Encryption, and there is not way to turn off that encryption. This is actually a feature of the Wireless Hosted Network API's built into Windows 7 to ensure the best security possible.You can give your "virtual" wireless network any name you want, and also set the password to anything. Just make sure the password is at least 8 characters.

Credits :
Chris Pietschmann - Chris is a Microsoft MVP on the Windows Live Platform, a Co-Founder of Carto LLC, and the Owner of Simplovation LLC a software development consulting company that specializes in Mapping/GIS related application development. You can view Chris' blog at http://pietschsoft.com


Frequently Asked Questions

Hope you would try this utility in windows 7 and share your experience by dropping comments below.
You can use Problem Steps Recorder to automatically capture the steps you take on a computer, including a text description of where you clicked and a picture of the screen during each click (called a screen shot). Once you capture these steps, you can save them to a file that can be used by a support professional or someone else helping you with a computer problem.


INSTRUCTIONS:
  1. Click on Start button and type Problem Steps Recorder.


  2. Click Start Record. On your computer, go through the steps on your computer to reproduce the problem. You can pause the recording at any time, and then resume it later.


  3. If you want to add a comment, click Add Comment.
  4. Use your mouse to highlight the part of the screen that you want to comment on, type your text in the Highlight Problem and Comment box and then click OK.
  5. Click Stop Record.
  6. In the Save as dialog box, type a name for the file, and then click Save (the file is saved with the .zip file name extension).
  7. To view the record of the steps you recorded, open the .zip file you just saved, and then double-click the file. The document will open in your browser.


Note:
  1. When you record steps on your computer, anything you type will not be recorded. If what you type is an important part of recreating the problem you're trying to solve, use the comment feature described below to highlight where the problem is occurring.
  2. Some programs, like a full-screen game, might not be captured accurately or might not provide useful details to a support professional.
Hope you liked the post &share your experience by dropping comments below.

You may also like to read:
Know your computer specifications and troubleshoot
How to increase your RAM without buying a new 

DxDiag ("DirectX Diagnostics") is a diagnostics tool used to test DirectX functionality and troubleshoot video- or sound-related hardware problems. DirectX Diagnostic can save text files with the scan results. These files are often posted in tech forums or attached to support emails in order to give support personnel a better idea of the PC the requester is using in case the error is due to a hardware failure or incompatibility.It reports detailed information about the DirectX components and drivers installed on your system.


Instructions:

  1. In the "Run" command dialog box , type "dxdiag".[ Win7 users can directly type dxdiag after clicking 'Start' button on the task bar.]


  2. Now click 'OK'.

  3. DirectX Diagnostic tool will show you system's information.


  4. Now you switch between the Display, Sound1, Sound 2, Input tabs to view if there is any problem to the drivers installed for the hardware of the computer.
Hope after reading this post you will be now having better overview of you pc and be able to troubleshoot your PC problems more easily.

For more cool tips stay tuned to Jasmeetishere.blogspot.com
There are many tools for converting different file formats into PDF but what certainlly beat all others is PrimoPDF. PrimoPDF converts just about any file type to a PDF, using the print command from the source program the file was created in. In the latest version, the program comes with desktop icon that you can drag and drop files onto for quick conversion, as well as performance improvements and minor changes throughout the program.


It is compeletly free and can be downloaded from here.


Advantages of having your documents in PDF is that , PDF is a universal format, you dont have to worry about the misalignment of your word documents, no compatibility issues of MS-office, no need to carry softwares to view a particular format because you will have everything in a single format ie. PDF .


Some of its unique features are:

  1. Create PDF files from 300+ file types.
  2. Make PDF files for different uses, including online viewing, eBooks, office printing, and prepress .

  3. Append PDF files after they are converted

  4. Secure with passwords and add document information (title, author, etc.) during creation
  5. Fast, intelligent one-button creation from Microsoft® Word, Excel®, and PowerPoint®.


    PrimoPDF also provides online facility to convert several files format having size less than 10 MB . The converted file will be delivered to you via email. To use this facility click here


Hope you liked the post.Drop comments below for any queries.
We often wonder if we can play our old damaged CDs or DVDs or we just want to recover an important data from damaged/scratched discs.We sometimes gives external treatment to the cd by polishing it but it occasionally fails to solve our problem.But this problem can be easily sort out by using a simple software tool i.e Get My Videos Back, that can be downloaded free from here.

Get My Videos Back is a small and simple application specificly designed to help you save video or audio files from scratched CDs or DVDs quickly and easy. This tool has several different options and features to save your media files.One of the features it includes is "byte mode" where you can read the source file from byte to byte. This might be helpfull if the source media has lots of small scratches.

Instructions:
  1. Download the software from here,and run GVMB.exe file.
  2. Click open and start button.
  3. Select the Source file and then Destination location.


The source file type by default supports all type of media file like MPEG,MP3,MP4 etc. But i had tried to recover several other formats of file by changing file type to All files instead of All media files during the source file selection step and it works perfectly for that also.So this program which is built basically to recover media files can recover almost all file formats.

Hope you would like the post and also share your experiance by droping coments below.
A day may come when optical drives(CD or DVD) will be hard to find as 5.25 floppy drives are today.So we need to learn ,how to make usb flash drives bootble for windows installation.With this you don't have to worry about scratches on the disc or misplacing your original media discs once you transfer their contents to the flash drive. The optical drive is quickly becoming a thing of the past.

On basis of purpose or sources available the various methods are discussed below.

Make Bootable Usb for Windows Installation:
  1. Download Koala a free tool click here.
  2. Insert you USB flash drive and Windows installation disk to your system.
  3. Open Koala and do scan for source and destination peraphirals.
  4. Select flash drive as destination and DVD as your source and press Start button.
Koala 1.0


Make Bootable Usb for .iso file:

If you are having .iso image of the Windows installation disk or .iso files of other popular versions of linux i.e Ubuntu,Mint,Fedora etc. then to directly make bootable usb out of that you need another simple free and light tool to do that easily.To download it click here

The process of this tool can be explained in just 4 easy steps!
  1. Check USB drive
  2. Format USB drive
  3. Choose DVD or ISO image
  4. Start the process


Make any Usb or portable drive a bootable disk:

  1. Download two files ‘Command File’ and ‘HP USB Disk Storage Format Tool’.
  2. Make a folder with name ‘BOOT’ and extract the file ‘Command’ in BOOT folder.
  3. Now install the other utility (HP USB Disk Storage Format).
  4. Open installed utility (HP USB Disk Storage Format) and in ‘Device’ filed select device that you want to make bootable (USB drive etc) Also check the option ‘Create A DOS Startup Disk’.
  5. Now press the browse button to locate the BOOT folder and hit the Start button.

To use this bootable drive on any computer always go to Bios Setting and set USB drive as ‘First Boot Device’.

Hope you will find the best method for yourself.Tell others also by dropping comments below.


Here is a small tutorial for all newbies to increase their computer's ram virtually , if you are having plenty of free disk space in your hard disk.


Just follow the simple steps given below:

  1. Right click "Computer " then click on "Properties".

  2. Then click on "Advanced system setting".


  3. Now go to "Advanced" tab , then under it , for performance options click on "Settings".

  4. Now under "Advanced" tab for virtual memory options click on "change".


  5. Now another dialog box will open [ virtual memory ] as shown below. In this , go to custom size and then set initial and maximum size for virtual memory i.e virtual ram , then click on set and restart your computer.


  6. Now you experience that your computer is working faster than before.

    NOTE: You can also enable "Automatically Manage Paging File Size For All Drives." during the fifth(5) step and click "OK".Such option allows Windows 7 to automatically lend virtual memory to any application as necessary.

    Hope you liked the post.

    For more cool tips stay tuned to jasmeetishere.blogspot.com.
Copyright © 2011-13 The content is copyrighted to Jasmeet Singh and may not be reproduced on other websites.The Next Tech Guide.
Blogger Template by Clairvo